Friday, November 9, 2018

Star Wars Imperial Assault

Well, historical wargaming has definitely not been a priority since I last finished up my 15mm American Paratrooper platoon for Chain of Command. I have recently discovered the pleasures of painting unique 28mm miniatures. Unlike when painting historicals the whole process is effectively a lot less tedious and monotonous, and while I really want to finish my 6mm Russian Napoleonic army, the idea of having to paint over 300 identical 6mm soldiers isn't something I eagerly look forward to. In any case here below is what I've been busy with for the last couple months, some Star Wars Imperial Assault miniatures :)

R2-D2 and C-3P0

Alliance smugglers

Chewbacca

Hera Syndulla

Ezra Bridger

Gideon Argus

Alliance Rangers

Sabine Wren

Zeb Orrelios

Han Solo

Friday, August 31, 2018

What's currently on the paint bench?

Hey guys!

Recently I have been able to finish up my 15mm American Paratrooper platoon for Chain of Command, and while I have a couple more bits and bobs left on my todo list in order to run a couple campaigns, I have currently gotten completely side tracked. As often happens with us wargamers we like to switch projects and game systems at the glimpse of an eye. So, out of seemingly nowhere, this week I decided to work on two very different sets of miniatures. The first little project was to get started on finally painting some 6mm Baccus Napoleonics which I have been sitting around untouched for nearly a decade. These were extremely quick and easy to paint, in two days I managed to paint up and base 96 little Russians. I'm very pleased with how they turned out and now have on my hands the task of painting a whole bunch more infantry, cavalry and artillery. In any case here are the little fellas!


Completely unrelated to historical wargaming I decided to also set on the side some old Games Workshop Lord of the figures, I have never actually painted 28mm miniatures and found that, while they naturally take a lot longer, it is a lot easier to get some nice realistic highlighting. I tried to work with different colors and have some fun, not aiming to actually replicate how they look in the movies. You seldom get to paint some exciting and bright colors when working on historical miniatures, so this side project was fantastic in helping me stay motivated and to have some fun on the side. I am extremely please on how they both turned out, particularly the fella on the right!


Saturday, August 25, 2018

Darrell "Shifty" Powers

Hello again,

For once this won't be a big update on any of my projects, after finishing my 15mm US Paratrooper platoon for Chain of Command I kept thinking: "well I'm theoretically finished, but what could I add?" Well I hadn't bothered painting up a sniper for the platoon, but at the same time I didn't want another prone figure with a scoped rifle covered in foliage (usually what my sniper units look like). So I thought, still keeping Band of Brothers as a reference, what if I depicted Darrel "Shifty" Powers? The man who in Easy Company was famous for having a great set of eyes and being a phenomenal shooter. 


I vividly remember that in Stephen E. Ambrose's Band of Brothers, there was a story about "Shifty"  during the Battle of Bulge which shocked me. He had been able to spot a tree a mile away which had not been there the day before. This "tree" was actually part of the camouflage used to hide a German AA battery, and was later bombarded and destroyed by battery fire thanks to him. So here is my attempt at depicting Shifty along with Sergeant Carwood Lipton, somewhere in Normandy, maybe in the fields leading up to the attack on Carentan? Here they are:


Hope you guys enjoyed this different post!

Friday, August 24, 2018

Finished US Paratrooper Platoon


Hey guys!

So the 15mm Chain of Command onslaught continues... Well after a long break, mostly due to having to focus on my final dissertation and other school work, I finally decided to start a new project altogether, at this point painting more Germans will simply fry my brain. 

As most WW2 buffs I have always been a huge fan of the HBO Band of Brothers mini series, using it countless times as motivation whilst painting. So this summer I decided to get on with it and finished up a little US Paratrooper platoon along with various support options. I decided to experiment with some new photo techniques. Yet, I made the mistake of not using a large enough sheet of paper so was forced to end up making some clumsy cropping which is a shame, but I was still quite happy with the final result and was not bothered too much. Here below is the full platoon with all its support options:


The core platoon is completely different to that of my previous German and British platoons, it consists of only two sections, but is nicely supplemented by a 60mm mortar section (unfortunately without a Junior leader attached). In any case being elite, making them extremely hard to hit, and being equipped with belt fed LMG's and Garands these guys truly pack a punch!


When it came to support options I didn't want to go overboard so I mostly focused on what I am planning on using on some of the campaigns I saw online: an extra squad, a 5 man MMG team, a forward observer for off table mortar support, a medic and finally 4 SMG gunners. If I deem it necessary in the future I might simply paint another Bazooka team and possibly a sniper.


In any case I'm quite happy with the project altogether, I tried out some new techniques and was able to paint these guys pretty quickly so I'm looking forward to trying them out!

Thanks for reading!

Friday, May 11, 2018

AAR: One Dark Night

Briefing

Today I present an AAR for a scenario which comes from the realm of fiction. The 2013 Christmas Special includes a very interesting mission where a U-boat landing party lands on the Southern Coast of England in order to pick up a German agent who has been captured by British militia in the area. The Agent, code name "Haddock," is the objective of the German landing party. Yet, the Germans are not quite sure where he is being held so they have to wait for Agent "Salmon," a British traitor, to come disclose the location where agent Haddock is being held.


The Germans start with 3 patrol markers, all at the Boat House, meanwhile the British get 4 at the Pointhouse, and 1 at Headland Point. Agent Salmon starts in the center of Traitors field and during each German phase gets activated automatically moving towards the German troops. What makes the scenario very interesting is that Germans can't move away from a defensive position near their jump off points until Salmon either reaches them, disclosing the location of the captured Agent Haddock, or if he dies (it is assumed they would be able to deduce where he is being held thereafter). The Germans win if they can rescue Haddock, but are pressed on time as nearby British regulars are making their way as reinforcements.

The German crew can be organised as the player desires, the following are available:
Kapitanleutnant Möller, Ranking Senior Leader (pistol)
Leutnant sur Zee Kollwitz, Senior Leader (MP38)
Oberbootsmann Wilmann, Junior Leader (MP38)
Bootsmanner Schiffer, Junior Leader (MP38)
Twenty‐four Matrosen (2 MG-34, 22 Rifles)

5 command dice are available to the Germans and they rolled a force moral of 9. They will use an adapted force moral chart, being relatively poor ground troops they will use chart B (from an adapted force moral loss of dice chart also present in the 2013 Christmas Special).


The British field the Homeguard "Witchford" platoon, with 5 command dice, and also rolled force moral also 9. Their composition is less flexible and is as follows:

Lieutenant Drummond, Senior Leader, pistol.
Sergeant Hannay, Senior Leader

LMG Team
Lewis Gun with three Crew (firepower 4 dice, reduced then to 3)

Section One – At Point House
Corporal Claridge, Junior Leader. Thompson SMG
Seven riflemen

Section Two
Corporal McCarthy, Junior Leader. Rifle
Seven riflemen, three of whom are at Headland Point on look‐out duty.

Section Three
Corporal Evans, Junior Leader. Thompson SMG
Seven Riflemen

Disclaimer: for the sake of this little scenario I have will simply be using my standard German and British troops, while I have looked into buying British Homeguard and a full landing party I think the time effort and cost is not worth it for such a small scenario.


AAR


The result after the patrol phase, the Germans are able to get in a nice position near Agent Salmon in the orchard on the Southern edge, meanwhile the British are able to deploy near the bunker which overlooks most of the table.

The Germans decide to split their crew into 2 main fireteams ahead of the fight

- Bootsmanner Shiffer leads an 8 man MG34 support section, made up of 2 MG-34 teams with 3 Crew and 1 rifleman each. 

- Oberbootsmann Wilmann leads the assault section, composed of 11 riflemen.

- Five men without any leader are left aside to make a small scout/reserve section.

-------------------> Battle Begins


The first german phase sees Wilmann's assault team deploy inside of the orchard in order to stay in cover from the British men in Point House, and on overwatch in case the British rush forward. meanwhile the traitorous agent Salmon begins to make his way towards the German troops. 


The British respond by deploying the Lewis gun team inside of Point House and fire down on salmon who is in the middle of the field, along with some support from the riflemen, Salmon meets his end in the rightly named "Traitor's field." Although the Germans are unsure where Agent Haddock is hidden, the British firing from Point House has given the position away. Oberbootssmanner Wilmann figures the gunshots are coming from the house at the intersection and assumes Haddock is held within.


On the next phase Leutnant sur Zee Kollwitz, joins the battle and makes the assault team run at the double towards closer to the house, threatening a British Jump-off point. He also orders two smoke grenades to be thrown to cover the advance (they suffer 1 shock by running, not displayed on picture below). The LMG support section deploys into the open and  Bootsmanner Shiffer orders both MG-34's to lay down some covering fire on the house.


Kollwitz joins the fray

At a critical juncture in the battle the British roll a triple 6, giving them a double phase and ending the turn. In the first phase they deploy Corporal Evans' section who orders them to Fire Five Rounds Rapid! As the turn ends, and the smoke clears, Sergeant Hannay jumps into the battle and orders the British to unleash some more lead into the Germans trapped behind the hedge. The Germans suffer 5 shock and 2 dead.
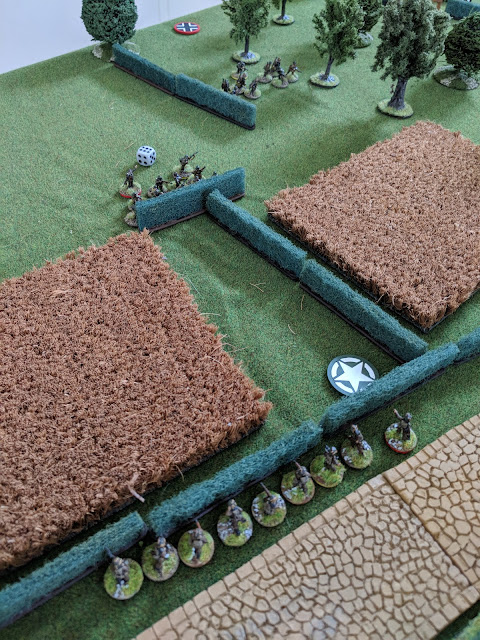
Sergeant Hannay directs some accurate fire onto the Germans

Nevertheless, the Germans are not quite done, Bootsmanner Shiffer orders both MG-34's to fire at the house. The deadly fire kills 3 riflemen, and knocks out Corporal Claridge, in addition to also causing 1 shock. Kapitanleutnant Möller, also joins the fight and runs off to help the assault section ordering them to throw 2 new smoke grenades. Leutnant sur Zee Kollwitz calms the troops down and removes 3 shock. Not pictured below is also the deployment of the small German reserve section who deploy on the flank.

Corporal Claridge is knocked out

British Lieutenant Drummond makes his way into the battle to take over command of Point House following Corporal Claridge's injury, and directs fire against the German's behind the hedge- Simultaneously, Corporal Evans orders his men to fire at the same target. Miraculously, and mostly due to the smoke, the Germans suffer no casualties or shock! Meanwhile, McCarthy's 4 man section is still being held back in reserve.


The German support team continues to fire at the British in the house causing 2 shock, killing 1 more rifleman along with Lieutenant Drummond who had just joined the battle. The British suffer a huge blow to their force moral (-2, now at 7), and are leaderless inside of Point House. Inspired by the success of the other sailors, the assault squad is firstly rallied by Moller (reducing their shock to 0), and then ordered to charge forward through the smoke and assault the British by Boostmanner Schiffer (No Handgranaten! was used as these are not trained infantry).

Boostmanner Schiffer leads the charge!

The close combat is deadly, the Brits role a whopping 25 dice! They kill 11, and cause 7 shock. The Germans roll 21 dice! They manage to kill 10 men and caused 1 shock, effectively wiping out the section and killing both the Senior and Junior leader. The British are forced to roll multiple Bad Things Happen, which see their force moral drop all the way down to 2 (-5). The Brits lose 3 command dice and 1 JoP (inside of Point House)

 The sole German survivor is a lone rifleman, who while having survived the bloody encounter breaks, with 8 shock to his name. Tragically, both Senior leaders, Moller and Kollwitz, along with Schiffer all perish in the deadly assault. The German  Bad Things Happen rolls drop the German force moral from 9 all the way down to 2 (-7). The Germans, using the modified force moral effects posted earlier, lose 3 command dice in addition to 1 of their JoP (not really relevant as all troops are deployed).

Battlefield empties... 

In the subsequent phase the British roll 2x 4's, and a 2. With no Senior leaders left they deploy their last section lead by Corporal McCarthy near Point House on overwatch. The Germans are only able to activate 1 team (rolling a 4 and 1), an choose to fire the MG-34 at the British inside of Point House causing one Shock on the Lewis gun team. 

The next British phase allows them to activate the rifle section and fire at the German support squad, causing no damage. On the other hand, the Germans roll a 3 and are finally able to unleash both Mg-34's against the house killing 1 man on the Lewis Gun team and causing some shock.


The Next British phase is of no use as a 4,4,5 are rolled. The Germans roll a 2 and try  to finish off the Lewis Gun team, hoping to break the British force moral. While they do no damage, they pile on 3 more stress on the lone gunner  which makes him break and lowers the British force moral down to 1.

The Lewis gunner runs off 
The British use the next phase to get the rifle team in the house down to the bottom floor and away from the deadly fire of the MG-34's(while I love the TT Combat Houses they sadly can't open multiple foors, so they are just placed near the windows). Meanwhile the Germans charge forwards, while still not in full view of the British. 


The British phase sees them activate the lone 3 men in the bunker (I must add that this is the first time they were activated all game), and fire at the Germans in the field causing 1 shock. Dice remain a limiting factor for the British. The Germans respond by pushing forwards once again and removing 1 shock. The British on overwatch fire but only  manage to inflict 2 shock. 

Wilmann's section gets close

The next phase proves to be another all or nothing by the Germans, with time nearly out as British reinforcements are dangerously close, Oberbootsmann Wilmann, takes off 1 shock and orders another Assault! The British roll 16 dice! Shockingly they only manage 2 kills and 1 shock. 
However, Wilmann is lightly wounded which brings the German moral down to 1!

On the other hand, the Germans roll 12 dice! Unlike the British they are more successful, managing to kill 5 and cause 2 shock. The team in the house is reduced to 2 men and pinned, while the other section suffers 2 dead and McCarthy is lightly wounded, the Bad Things Happen roll drops the force moral to 0. The British surrender, and Agent Haddock is retrieved by Wilmann and his squad, but at what cost...


Total casualty count:
-British: 16 riflemen, 1 Junior leader, 2 Senior leaders.
-German: 11 riflemen, 1 Junior leader, 2 Senior leaders.
----------------------------------------------------------------------------------------------------------------------------------------------------------------------------------------------------------------------------------------------------

Concluding thoughts

I want to start by saying that this was really an awesome scenario! I think this is the most fun I have had playing Chain of Command so far. While it would have been amazing to be able to run this scenario with some real British homeguard figures and some U-boat landing crew, I think that its still a great scenario to run usomg proxies. I really recommend people try this one out, its a quick and creative little scenario.

In terms of the actual action it was definitely a mistake to charge the assault team, but as time was a factor I thought it could have crushed British force moral and opened the way for a quick victory. On the other hand it just made it longer and more bloody, forcing a desperate final assault. While the 3 riflemen in the bunker played essentially no active role, they did didn't allow the Germans to surround the house from multiple flanks which was quite crucial. 

Friday, April 20, 2018

AAR: Flank Attack


Well I've been wanting do to an AAR for a while so it's finally about time I got around to it, this battle has been part of a little mini-campaign which revolved capturing this little town somewhere in Normandy facing off a regular British platoon against a regular German platoon. It's been a way to keep it from being just a one off kind of battle, but also not a large commitment like a larger PSC may be.

Intelligence

Here is a aerial "reconnaissance" shot taken sometime before the battle:


The Germans had 6 support points available and chose to bring an Sdf Kfz 232, an 8 wheel reconnaissance vehicle with a 20mm autocannon, in addition to an adjutant. The vehicle will be used a mobile support platform to try force the British out of the buildings. Force moral: 11.

The British on the other hand had 4 support points at their disposal and opted to focus on funneling the German troops, taking 2 minefields and some barbed wire to try and prevent them from easily advancing towards the town. Force moral: 8.


AAR

German forces quickly deploy on overwatch on both the left and right flanks, trying to spread out the British defenders.


The British respond by deploying a squad of their own on the far right and fire down on the Germans in the field, concentrating the Bren fire on the LMG team, killing 1 crew man and inflicting 2 shock. The Germans on overwatch respond with deadly fire, killing 2 riflemen and wounding the Junior Leader.


A second section is deployed in a building on the right flank, along with a light mortar near the wall below. Their combined fire fails to do any damage to the Germans on the left, yet 1 rifleman perishes from the return overwatch fire.


A poor roll forces the German platoon sergeant to jump into the battle early, he removes the shock from the LMG team and directs the fire against the British in the house, 1 more rifleman dies and 2 shock is inflicted.


Poor roll on the British side forces both Senior Leaders to jump into the battle to unhinge things, some more concentrated fire kills one more LMG crew and inflicts 2 shock. Meanwhile on the left flank everything remains quite calm.


German double phase! Troops push up to the hedge to take advantage of the 2 smgs (JL + SL), Panzerschreck team is also deployed and ordered to fire at the house by the Senior Leader. The combined fire causes lots of British casualties, 3 dead riflemen. More importantly the Junior Leader perishes due to a second wound.


The German 232 also finally makes an appearance, taking position in the middle of the road on overwatch, covering both flanks.


The next two phases see both British and German platoons deploying an extra section on the right flank, the British manage to eliminate the LMG team from the first German section and cause 1 shock, the Germans respond by killing 1 more rifleman on the already heavily damaged British first section and pinning it (only the Senior leader and a 2 man Bren team are left). Things remain quiet on the left as the focus remains all on the right flank.


AMBUSH! The British use the Chain of Command dice they were saving up to try and take out the 232 with their PIAT team, while they manage to hit the armored car, the subsequent strike roll results in only 1 hit and the 232 rolls 1 save. The vehicle manages to make it out of the ambush unscathed.


On the right flank the Germans are finally able to kill off one more rifleman and force the British squad and the Senior leader to break. The 232 does some work on and manages to kill riflemen 3 men and inflict 2 shock on the other British section. Nevertheless, The British roll a double phase! The British fire back and finish off the Panzershreck team (the loader had previously died), and the German Senior Leader is lightly wounded. Minor skirmishing continues on the left flank with a few casualties exchanged.


The British double phase has completely flipped around the battle,the Platoon Lieutenant runs back and helps direct fire against the German squads. The weakened British squad heroically manages to knock down both of the Junior leaders. This is a disastrous result for the Germans, along with a lightly wounded Senior leader, and no CoC dice (it had been used for an interrupt early in the game), the Germans begin to grind to a halt on the right.


To make things even worse for the Germans the British Senior leader on the left flank combines the fire from the light mortar and the third section to continue to dent the German section, and even manages to knock out the 3rd Junior Leader. 


In the next phase the Germans try and manage some shock and fire back against the British causing very minor damage. Without any of their Junior Leaders, and a wounded Senior Leader, it has become impossible for any real organised action, and they are unable to push forward. 

On the other hand, the British continue their streak of good luck, and even though there are only 4 men and the SL left on the right flank, they manage to also knock out the German Senior Leader. The PIAT deploys and fires against the 232. This time the armored car gets hit hard, the commander gets wounded and 2 shock is inflicted. 


The last three phases were disastrous for the Germans and phenomenal for the British, they managed to knock out 4 leaders and also wound the commander in the 232. All of this caused the force moral to drop from 11 all the way to 3 in a matter of a couple phases. With their moral at 3, no CoC dice, and no leaders able to rally the troops, the scenario has been deemed unwinnable and the German forces pull out of of the outskirts of the town.


A narrow British victory!

-----------------------------------------------------------------------------------------------------------------------------------------------------------------

Concluding thoughts


This battle displayed just how quickly the odds can dramatically swing in Chain of Command, the Germans seemed to be in complete control, yet a devastating British double phase with some great rolls managed to somehow knock out 3 German Junior leaders in a couple rounds of shooting. The battle was ultimately heroically won by a the 4 man section that held the house on the right, fighting off 2 German sections with only 1 rifleman and a 2 man bren team and their Junior Leader. The British Platoon Lieutenant will get commended for his heroics during the battle, after initially retreating as his troops faced overwhelming odds, he ran back and managed to keep the right flank alive.

The Germans on the other hand might have made a mistake in picking the 232, although it was able to inflict some serious damage it also didn't allow any flank to be stacked with more German troops. They also remained too static on the left flank, and too many resources were wasted on the right flank. Yet, had those 4 pesky Brits been unhinged from the house on the right then the Germans would have been able to surround the remaining British. I mean what were the odds of the British being able to knock out 4 leaders?

In any case next week I'll run the same scenario, this time the Germans will get some more support options!


Thanks for reading!

Wednesday, April 18, 2018

German Reconnaisance

Today I finally finished up some more Chain of Command support options for my little 15mm Germans, this time around I painted up some reconnaissance elements. This also gave me a chance to practice painting some more camouflage, as I don't have an airbrush (not only do I not have the space nor do I want to make the investment), it remains quite difficult to make a natural "feathered" camouflage pattern. So, this week I tried two different methods, on the armored car I used a little sponge to paint the camouflage pattern, while on the halftrack I opted to try and go for a more linear freehand pattern. 

Overall I'm somewhat pleased as from a tabletop distance they both look quite good. Nonetheless, I wish I had used lighter colors for the camouflage on the armored car, I used Vallejo Chocolate Brown and Reflective green, but after a wash it was just much too dark overall. While the linear pattern on the halftrack wasn't exactly what I was hoping to achieve, but I suppose for a first try it will do.


The reconnaissance team with the Sdf Kfz 250, a smaller variant of the 251 meant to hold only 4-5 men. Priced at 3 points I find that this is definitely a support option that I might use a fair bit, the ability to zip a small fire team around the battlefield could held unhinge a stalemate.


The armored car is Sdf Kfz 231 (8 rad), armed with a 20mm autocannon (AP 4, HE 6) and a co-ax MG it definitely also packs quite a punch for a vehicle only costing 5 points. Furthermore, its ability to move and shoot the turn it deploys, and moving double on a road, once again gives me a very mobile firing platform for my platoon. The only downside of the 231 is that while it does have 3 armor, unlike the smaller 222 it isn't "small" or "low profile," making it a much easier target for enemy anti tank weapons.

Where does this leave in me in terms of future projects? Currently for the Germans I'd still like to add a 75mm infantry gun, a Panzer III and a Sdf Kfz 222. Whilst for my British I should be able to finish up quite a nice selection of supoort options by the time the weekend rolls round. 

Thanks for reading! :-)